Customize your Schedule page display by adding, removing and sorting columns.
While viewing your Schedule, columns can be added and removed to display specific People and Project data.
Add and Remove Columns
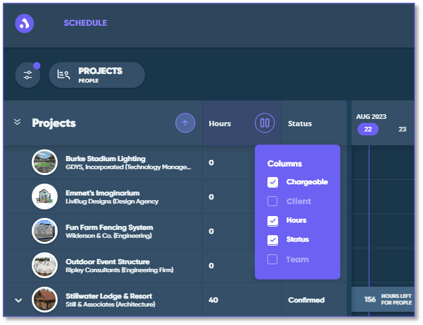
To add or remove columns:- Hover your cursor over any column header and select the
 Add / Remove Column icon to display the Columns drop-down list.
- Active columns can also be removed by deselecting them from the list.

- Active columns can also be removed by deselecting them from the list.
- Select the check box next to the Column name to display that column on the Schedule page.

- To leave the drop-down list, select any area outside of it.
Note: Columns can't be moved to the left of the People / Projects column.
Move Columns
The order of columns can be customized on your Schedule page.
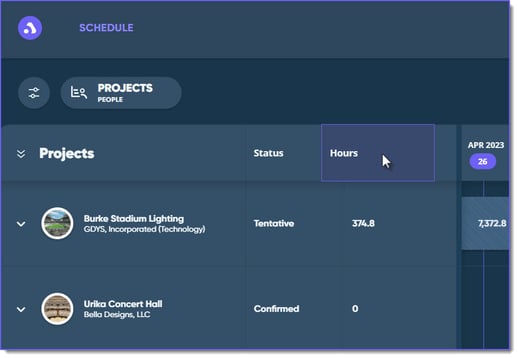
- Select and hold any active column header to select that column. The column header turns purple to show it's selected.
- Drag the column left or right to the preferred location. The dividing line between column headers turns a thick purple to display where the column is inserted.


- After the column has been moved, the new column order is automatically saved and retained after logging out and logging back in. This process can be repeated for all active columns.
Adjusting Column Width
You can expand the column width to display more column data or shrink the column width to fit more columns in the displayed area. Once resized, column widths remain at that width until changed again.
To resize a column:
- Hover your cursor over the right edge of the column you want to resize to display the
 Column Adjuster.
- Select and hold the Column Adjuster as you drag it to the right to increase or to the left to decrease the column width.
- Release the cursor when finished resizing the column.
Sort Columns
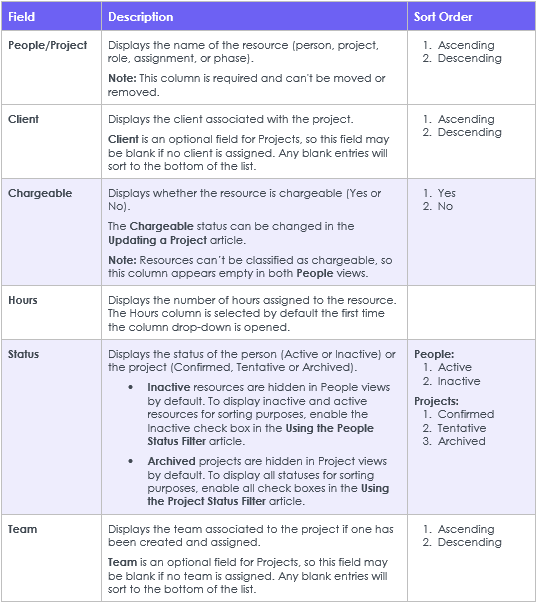
You can sort columns to be ascending or descending alphabetically in certain column headers.
Note: When you sort columns, the columns remain in their sorted order even when you switch between People and Project views and when you exit and reopen the application.
To sort the columns:
- Hover over a column header and then select the
 Sort icon to toggle the column view by ascending or descending.
- When a column is sorted, the
 Sort icon changes.
 - The columns are set to ascending by default.

- When a column is sorted, the
Adjusting Grid Width
- Hover your cursor between the People / Projects views and the Schedule to display the divider line.

- Select and drag the Divider Line left or right to adjust the width of the column area and your Schedule view.
- Drag the Divider Line to the right to expand the column area. This extends the width of the last column only, but you can adjust the other column widths to fit the new area.
- Drag the Divider Line to the left to expand the Schedule view.
- Release to drop the divider line in its new location.
- You can also use the
 Grid Divider icon in the divider line to adjust the grid width.
- Select the left arrow in the Grid Divider icon to expand the Schedule view to the full width of the page.
- Select the right arrow in the Grid Divider icon to expand the column area to the full width of the page.
Note: When the Schedule view or column area is expanded to the full width of the page, select the arrow to set the grid width back to the default.
See Also:
Switching Between People and Project Views
