Audere makes it easy to manage your resources' time with the default calendar or additional work calendars.
Note: This functionality is only available for Administrators and Owners.
- Verify the default work calendar and use as-is
- Update the default calendar to best match the needs of your organization (single calendar for all users)
- Add more calendars to assign different calendars to different users (multiple calendars)
Note: Once multiple calendars exist, you can designate one of them as the default calendar. The default calendar is applied to all users unless otherwise set.
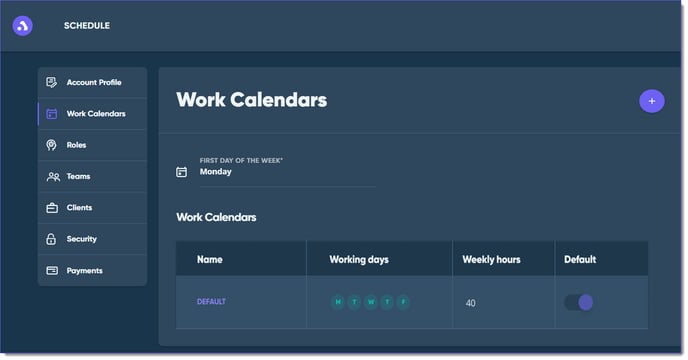
Verify the Default Work Calendar
A default work calendar is provided with standard settings.-
Select your Profile icon in the upper-right corner of the page and then select Account Settings from the drop-down menu to open the Account Settings page.

-
Select Work Calendars from the side menu.
-
Review the following defaults set for the work calendar created for your Schedule:
- First Day of the Week: Monday
- Name: Default
- Working Days: Monday, Tuesday, Wednesday, Thursday, and Friday (weekdays)
- Weekly Hours: 40
- Default: automatically enabled on the default calendar
Update a Work Calendar
Set the work calendar options to best match the needs of your organization.
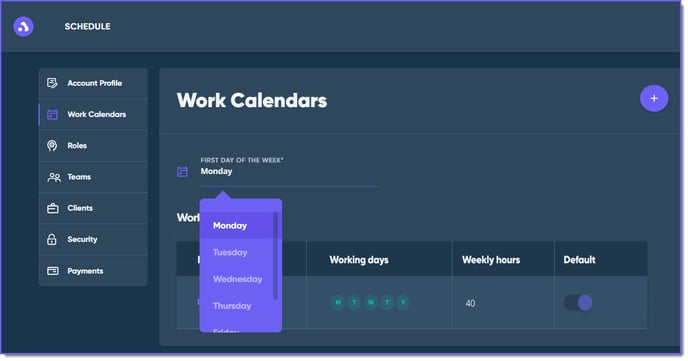
To edit the default calendar or an added calendar in the Edit Calendar dialog:
- Select inside the First Day of the Week field to select a new day from the drop-down list.
- Select the calendar title in the Name field to edit an existing calendar.
-
Enter a unique name for the calendar in the Name field.


-
Enter the number of default working hours for a day to mark it as a Working Day or (0) zero to set the day as a Non-Working Day. This calculates the total Weekly Hours for the Schedule.
- Once complete, select Update to save or Cancel to close the dialog without saving.
Caution: Inform team members about the calendar update before applying it. Unsaved work may be lost after applying the live update.
In the Edit Calendar dialog, select the Delete icon to delete that work calendar.
- The default calendar can't be deleted.
- If you delete a calendar that has people associated to it, those people shift to the default calendar once it's deleted.
See Also:
Adding a New Project to the Schedule
Personalizing the Schedule Page Display